Pages

Tuesday, March 27, 2012

Springtime Easter Cupcakes with Fondant Animals

The Internet is so incredible.  I mean, I'm so inspired by so many people out there who do such creative and amazing work, and take the time to post about their creations!  Often I find myself looking around for ideas about one project, and then *paf!* I'm suddenly finding other ideas for projects that I want to do.  This is about one of those projects.  Today I created 36 springtime Easter cupcakes with fondant animals.  And here is how I did it.

Have I mentioned before that I love working with fondant?  Fondant is really my friend.  We get along great.  My BFF.  Not only does fondant cover cakes beautifully, but it can be formed into anything, from brick facades to flowers, and for this time, animals.  I make my own marshmallow fondant, and it's freaky-easy to do.  Don't let fondant intimidate you:  she's pretty easy going despite her reputation.  Here's the recipe I use:

http://allrecipes.com/recipe/marshmallow-fondant/

Marshmallow Fondant (also known as MMF):
Ingredients

  • 1/4 cup butter
  • 1 (16 ounce) package miniature marshmallows
  • 4 tablespoons water
  • 1 teaspoon vanilla extract
  • 2 pounds confectioners' sugar, divided

Directions

  1. Place the butter in a shallow bowl, and set aside.
  2. Place the marshmallows in a large microwave-safe bowl, and microwave on High for 30 seconds to 1 minute to start melting the marshmallows. Carefully stir the water and vanilla extract into the hot marshmallows, and stir until the mixture is smooth. Slowly beat in the confectioners' sugar, a cup at a time, until you have a sticky dough. Reserve 1 cup of powdered sugar for kneading. The dough will be very stiff.
  3. Rub your hands thoroughly with butter, and begin kneading the sticky dough. As you knead, the dough will become workable and pliable. Turn the dough out onto a working surface dusted with confectioners' sugar and continue kneading until the fondant is smooth and no longer sticky to the touch, 5 to 10 minutes.
  4. Form the fondant into a ball, wrap it tightly in plastic wrap, and refrigerate overnight. To use, allow the fondant to come to room temperature, and roll it out onto a flat surface dusted with confectioners' sugar.

And of course you can buy pre-made fondant, but WHY?  It's expensive and tastes awful.  Homemade fondant tastes amazing, and is cheap to make.  So do yourself a favor and whip up a batch.

Once you've got your fondant made, you're ready to make your animals.  Make a portion of fondant in different colors:  yellow, pink, orange, and white.  You will also need black, but you can make black fondant out of your extra orange fondant later.  Wrap each color in plastic wrap and seal in a Ziploc bag.  One batch of marshmallow fondant (MMF)  using the recipe above makes more than enough to make 36 animals for 36 cupcakes.


I began with making the white bodies of the sheep.   Take a small amount (about 1.5") and make it into a ball.


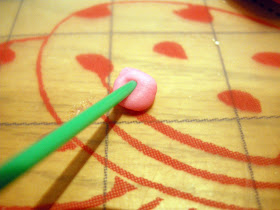
With a stick, press an x shape gently into the fondant.  


Pinch the corners into small legs.


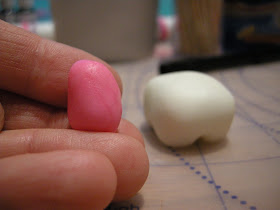
When you're done, you will have something that- to me- looks something like a molar (tooth) with short roots.  I made nine of these.


Since I was working with white fondant, I made the bunny bodies next.  I forgot to take photos of that process, sorry!  I set them aside to dry and firm up a bit.  Seal the extra fondant in the bag- you're going to need it for detail work later.

Then I made pink bodies for the pigs.  The pigs were a little more challenging because I had to form the head and body as one piece.  But I was able to make it work.  The legs were formed in the same way as the sheep.  


  I pinched off small pink pieces of similar size to form the ears.  I rolled the piece into a small ball, and used the end of my paintbrush to make an indentation like an ear.


 Then I painted my edible glue on the head and placed the ears on.  


And how do you make edible glue?  Take a small amount of Gum-Tex and a few tablespoons of boiled water and mix well.  It will form into a gel that works as an amazing edible glue!  It's almost invisible, too.  Refrigerate it overnight if you have the time for it to really set up well.  It's good for about a week. You use a food safe paintbrush to dab the gel on whatever you want to stick.  


 Next, I took a little larger piece of pink fondant and made a ball.  I made it into a flattened oval to make the nose.
  I used a toothpick to make the nostrils.
Then I glued it onto the pig's face.


 Using an edible ink marker, I drew on eyes.  

Oink!  Oink!
I can't help but smile when I see a group of pigs on top of a container of Crisco!  Ha!


Normally, I like to use the Americolor edible ink pens, but on fondant, I found that the CopyKake pens performed much better.  Make sure you put your extra pink fondant in a tightly sealed bag- you will need the extra fondant for more detail work later.


And of course, these little guys had to have little tiny tails.  So cute!


Last, I made the yellow chicks.  These were so easy!  Take a small amount of fondant and mold it into a chick shape. 
  I rolled out a long stringy piece and cut it into small pieces.  Then I placed each piece on top of the head as "hair", attached gently with a toothpick and edible glue.  Small wings were made from fondant- they're teardrop shaped. I made a small orange 'beak' from the orange fondant.  I just pinched off a small amount and formed it by hand and attached it with edible glue.  Eyes were drawn on with edible ink marker.

At this point, I stopped for the day so my new creatures could dry out a bit and harden up.  I set to finish my detail work the next day.

I began by rolling out small pink balls for the sheep heads.  I tried to make sure that each 'head' was in proportion to a body.  Then I attached the heads to the bodies with my edible glue.  I then moved on to making other creatures so the heads would be completely dry on the bodies before adding additional weight with the ears and 'fleece'.  

During this time, I made my black fondant using some extra orange fondant.  I wrapped it in plastic wrap and placed it in an air tight bag to rest while I got to finishing up the other animals.  The black will be the ears and nose for the sheep.

 I washed my hands well and decided to get back to the bunnies.  Using white fondant, I made two small balls for 'hands', and one small ball for a 'tail'.  All were attached with edible glue.  
After attaching all the hands and tails, I moved to my pink fondant for the ears and nose.


I pinched off small amounts of pink for the ears, and using the end of my paintbrush and edible glue, I gently worked the pink 'ear' into the inner part of the rabbit's ear.  A small amount of pink was also used for the nose.  Add two small edible ink drawn eyes, and the bunny is complete!


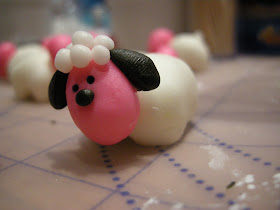
After this, I figured my sheep heads were dry on their bodies, so I decided to form their ears and noses with the black fondant.  
The ears are small teardrop shapes, attached with edible glue.


The noses are just little round black fondant balls.  Draw on the eyes.  I washed my hands to remove all traces of black, then began to finish up with the sheep's 'fleece'.


 Using white fondant, take small amounts and make teeny tiny balls.  When you have about a dozen of these, paint the entire sheep's head between the ears with edible glue and gently put the balls on the head.  
They will stick very easily and stay put.  Baaaaaaaa!!!

Now let everything dry overnight.  You're going to give them all their own place to hang out tomorrow!

The following day, I baked 36 chocolate cupcakes.  I found these adorable brown and pink flowered cupcake liners that work very well with the springtime theme of these cupcakes!  


I used a green buttercream frosting in a piping bag and a grass tip (Wilton #233).
 I covered the cupcake in green grass.


Then I placed the little sheep and pigs on top.  Easy!


The chicks needed a nest, though.  Using another grass tip and piping bag, I used chocolate frosting and swirled the frosting into a nest shape.


Then I placed the chick inside.


The Easter Bunnies wouldn't be complete without Easter eggs around them.  I used Whopper Robin Eggs, Cadbury chocolate eggs and speckled egg M & M's placed around Mr. Rabbit.  


I love how these turned out!  These are so dang cute that I don't know how anyone can eat them.  They're destined to go to my children's preschool tomorrow, so somehow, I don't think any of the kids will have a problem with gobbling up these springtime treats!


No comments:

Post a Comment